

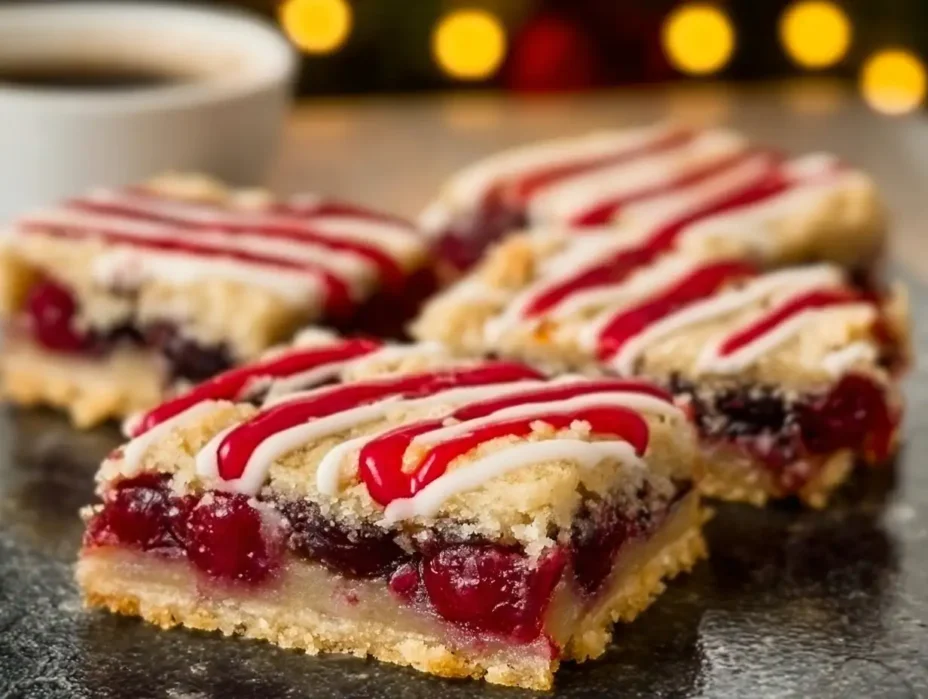
“There’s nothing quite like the sweet aroma of cherry filling baking in the oven.”
Christmas Cherry Bars have a way of making the holiday season feel extra special. I can still remember my first attempt at baking these festive bars, and the joy on my family’s faces as they bit into the cherry-infused dessert. You’ll love how easy they are to make and how each bite delivers a burst of flavor, inviting everyone to grab just one more piece. This delightful dish is not only warm and comforting but also brings back fond memories of time spent in the kitchen with loved ones.

Table of Contents
Why are Christmas Cherry Bars a Must-Try During the Festive Season?
Christmas Cherry Bars encapsulate the season’s spirit with their vibrant flavors and simple preparation.
Now is the perfect time to try your hand at Christmas Cherry Bars! These sweet treats offer a delightful balance of flavors that makes them an ideal dessert for holiday gatherings. Easy to prepare yet impressive enough to serve at a formal dinner, they bring comfort and joy. Plus, the delightful aroma of cherries baking will fill your home with holiday cheer, making this recipe a crowd-pleaser. If you’re looking for more festive delights, don’t forget to check out the Holiday Cookies for inspiration!
What Makes This Recipe for Christmas Cherry Bars Unique?
This version of Christmas Cherry Bars combines traditional flavors with a quick and easy preparation method.
Easy Preparation
This recipe simplifies the baking process without compromising flavor. Using just a handful of ingredients, you can whip these bars up in no time, making it a stress-free addition to any holiday gathering.
Cherry Filling
The canned cherry pie filling is what makes these bars super convenient. However, feel free to swap it for fresh or frozen cherries for an extra burst of freshness. This versatility allows you to adapt it according to the ingredients you have on hand.
Almond Glaze Twist
Drizzling the bars with an almond glaze adds an elegant touch that complements the cherry flavor beautifully. Almond extract enhances the taste profile, making this dessert truly special. To learn more about the benefits of almonds, you can visit Healthline. For more ideas on delicious holiday eats, don’t miss out on the Christmas Bars collection.
What Ingredients Are Needed to Make Christmas Cherry Bars?
Gather these simple ingredients to make the delectable Christmas Cherry Bars.
| Ingredient | Quantity |
|---|---|
| Unsalted Butter | 1 cup |
| Granulated Sugar | 1/2 cup |
| All-Purpose Flour | 2 cups |
| Salt | 1/4 teaspoon |
| Cherry Pie Filling | 1 can (21 ounces) |
| Powdered Sugar | 1/2 cup |
| Almond Extract | 1 teaspoon |
| Milk | 2-3 tablespoons |

Butter serves as the base for the crust, creating a rich flavor and flaky texture. For a lighter option, you could try substituting coconut oil, giving it a unique twist. Cherries are not just delicious; they are also an excellent source of antioxidants. Don’t forget the touch of almond extract! It pairs beautifully with the cherries, elevating the taste to a new level.
How Do You Make Christmas Cherry Bars Step-by-Step?
Follow these simple steps to create your own delicious Christmas Cherry Bars.
Step 1
Preheat your oven to 350°F (175°C) and grease a 9×13-inch baking pan. This ensures your bar won’t stick during baking, making for easier serving later on!
Step 2
Cream together the butter and granulated sugar in a mixing bowl until light and fluffy. The texture should be airy, which creates a tender, delicious base for your bars.
Step 3
Gradually add in the flour and salt, mixing until just combined. Be careful not to overmix, as this can make the crust tough!
This step is vital for texture, no one wants a dry bar. Ensure you focus on combining them until smooth, creating a lovely dough.
| Prep Time | Cook Time | Cool Time |
|---|---|---|
| 10 minutes | 25-30 minutes | 30 minutes |
Now that you have your dough ready, it’s time to assemble:
Step 4
Press the dough evenly into the bottom of the greased baking pan, ensuring that it reaches the edges.
Step 5
Spread the cherry pie filling evenly over the dough. You want every bar to have that delightful cherry flavor.
Step 6
Bake for 25-30 minutes, or until the edges are lightly golden. Keep an eye on them; nobody likes a burnt edge!
Step 7
While the bars are baking, let’s prepare the glaze. Mix powdered sugar, almond extract, and milk until it reaches a smooth consistency.
Step 8
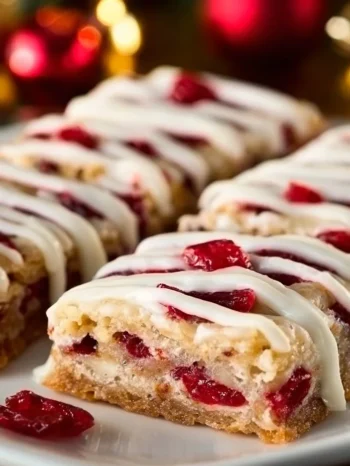
Allow the bars to cool completely before drizzling the almond glaze on top. Once cool, cut them into squares and serve!
For those who love simplicity in baking, these bars are a great choice. Each step is straightforward! Since every kitchen is unique, remember to adapt any recommendations based on your oven and pan type. If you’re looking for recipes with a bit more flair, take a peek at this Grinch Oreo Truffles recipe for festive inspiration!
What are Some Variations and Serving Suggestions for Christmas Cherry Bars?
You can easily adapt Christmas Cherry Bars to suit your taste preferences.
Diet Swap
To make this recipe gluten-free, consider substituting all-purpose flour with a gluten-free baking blend. The texture may vary slightly, but it will still be delicious!
Flavor Variation
For a tropical twist, swap out the cherry filling for pineapple or raspberry. Different flavors can create whole new wow factors for your guests!
Serving Idea
Serve these bars warm, topped with a scoop of vanilla ice cream or whipped cream for an indulgent treat. They also make delightful party snacks when cut into smaller squares.
| Suggested Pairings | Tips |
|---|---|
| Vanilla Ice Cream | Serve warm for the perfect melt. |
| Whipped Cream | Add a fresh cherry on top for flair. |
Thinking outside the box could lead you to creating a memorable holiday dessert. Every bite of these thoughtfully designed bars guarantees satisfaction. Also, check out the Easy Banana Cupcakes for another sweet addition to your dessert table!
Final Thoughts on Christmas Cherry Bars
Christmas Cherry Bars are a delightful addition to your holiday dessert platter. Their combination of buttery crust and sweet cherry filling ensures they’re a favorite at any gathering. I highly encourage you to personalize and make them your own. Don’t hesitate to save this recipe and share it on Pinterest for others to enjoy!
Consider storing them in an airtight container for up to a week, if they last that long! If you make a batch, you can freeze them for a holiday treat any time of year. I wish you all a merry baking experience!
FAQ
Can I use fresh cherries instead of canned pie filling?
Absolutely! You can use fresh or frozen cherries, but remember to adjust the sweetness as needed with sugar. Fresh cherries will create a more vibrant flavor!
Can I make these bars ahead of time?
Yes, these bars can be prepared and baked a few days before your event. Just store them in an airtight container in the fridge.
What’s a good substitute for almond extract if I don’t have it?
You can use vanilla extract as an alternative. It will provide a different flavor profile but will still taste great.
How can I store leftover bars?
Store leftover Christmas Cherry Bars in an airtight container at room temperature for up to a week, or refrigerate for longer freshness.
Can I add nuts to the recipe?
Yes! Chopped nuts like walnuts or pecans can add a great crunch. Just sprinkle them on top before baking.
Christmas Cherry Bars: A Festive Delight for Your Holiday Table
Indulge in blissful bites of Christmas Cherry Bars, a simple yet delectable treat that brightens up any holiday gathering with a buttery base topped with luscious cherry filling and a drizzle of almond glaze.
- Total Time: 40 minutes
- Yield: 12 servings 1x
Ingredients
- 1 cup Unsalted Butter
- 1/2 cup Granulated Sugar
- 2 cups All-Purpose Flour
- 1/4 teaspoon Salt
- 1 can (21 ounces) Cherry Pie Filling
- 1/2 cup Powdered Sugar
- 1 teaspoon Almond Extract
- 2–3 tablespoons Milk
Instructions
- Preheat your oven to 350°F (175°C) and grease a 9×13-inch baking pan.
- Cream together the butter and granulated sugar in a mixing bowl until light and fluffy.
- Gradually add in the flour and salt, mixing until just combined.
- Press the dough evenly into the bottom of the greased baking pan.
- Spread the cherry pie filling evenly over the dough.
- Bake for 25-30 minutes, or until the edges are lightly golden.
- While the bars are baking, prepare the glaze by mixing powdered sugar, almond extract, and milk until smooth.
- Allow the bars to cool completely before drizzling the almond glaze on top, then cut them into squares and serve.
Notes
For a tropical twist, swap out the cherry filling for pineapple or raspberry. Serve warm topped with vanilla ice cream or whipped cream for an indulgent treat.
- Prep Time: 10 minutes
- Cook Time: 30 minutes
- Category: Dessert
- Method: Baking
- Cuisine: American
- Diet: Vegetarian
Nutrition
- Serving Size: 1 bar
- Calories: 250
- Sugar: 15g
- Sodium: 200mg
- Fat: 12g
- Saturated Fat: 7g
- Unsaturated Fat: 4g
- Trans Fat: 0g
- Carbohydrates: 32g
- Fiber: 1g
- Protein: 3g
- Cholesterol: 30mg
1 Comment
[…] of laughter, warmth, and the shared love for good food and company. You can also try out my Christmas Cherry Bars to share more deliciousness with your loved […]