

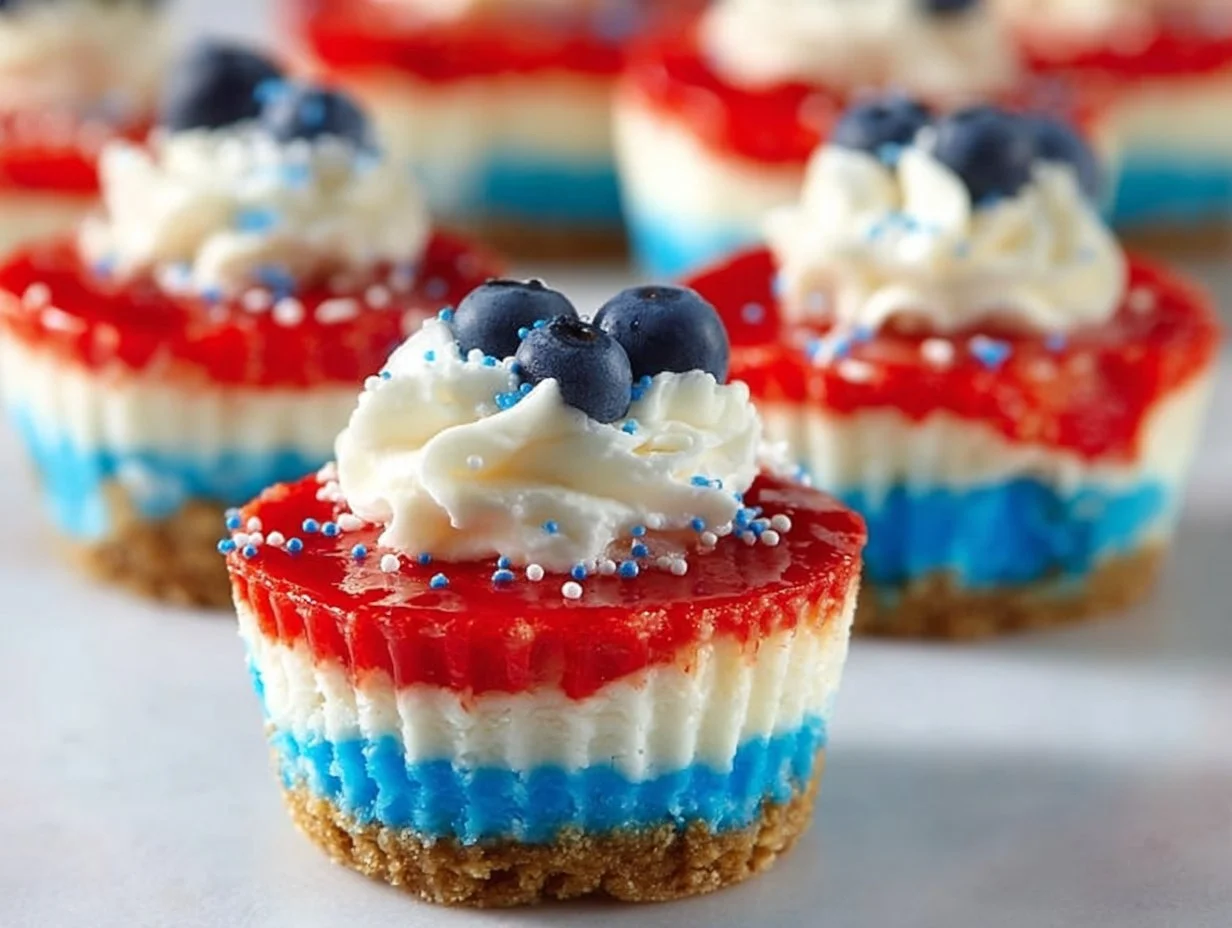
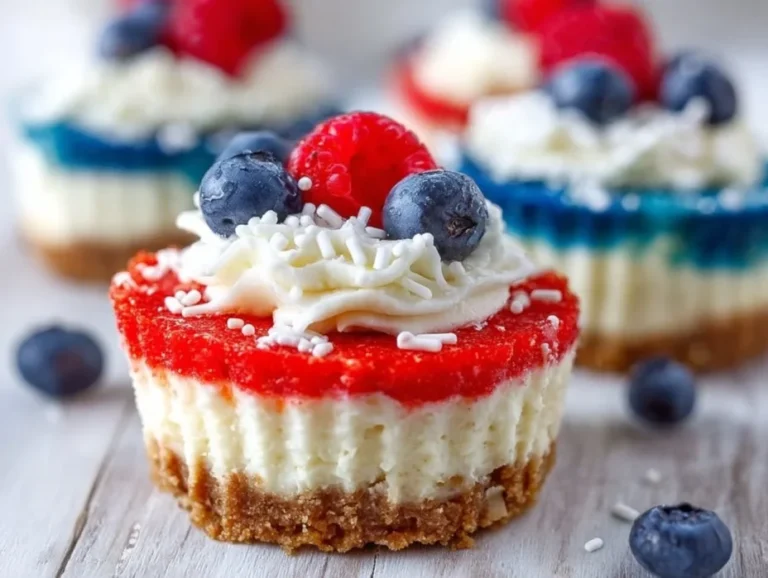
Red, White and Blue Mini Cheesecakes are a delightful and festive dessert that perfectly captures the spirit of summer celebrations and holidays alike. These adorable little cheesecakes feature layers of creamy goodness in vibrant colors adorned with fresh strawberries and blueberries. With a delightful graham cracker crust and a smooth filling, they are not only a feast for the eyes but also a deliciously sweet treat that everyone will enjoy.
Recipe at a Glance
| Best for | Summer celebrations, BBQs, and patriotic holidays |
| Difficulty | Easy |
| Total time | 2 hours 30 minutes |
| Servings | 12 |
| Key tip | Chill the cheesecakes well for best texture |
| Smart swap | Use sugar-free sweetened condensed milk for a lighter version |
What are the main ingredients in Red, White and Blue Mini Cheesecakes?
The main ingredients in Red, White and Blue Mini Cheesecakes include graham cracker crumbs, cream cheese, sweetened condensed milk, and food coloring for vibrant layers. These elements are essential for achieving the rich, creamy texture and delightful flavors. You can substitute the sweetened condensed milk with a low-fat or dairy-free alternative to suit various dietary needs.
| Ingredient | Quantity |
|---|---|
| Graham cracker crumbs | 1 cup |
| Sugar | 1/4 cup |
| Unsalted butter, melted | 1/2 cup |
| Cream cheese, softened | 8 oz |
| Sweetened condensed milk | 1/2 cup |
| Vanilla extract | 1 tsp |
| Whipped cream | 1 cup |
| Red food coloring | As needed |
| Blue food coloring | As needed |
| Fresh strawberries | For topping |
| Fresh blueberries | For topping |
Key ingredients like cream cheese provide a rich, smooth texture that is essential for a quality cheesecake, while sweetened condensed milk adds necessary sweetness. For a different flavor profile, you could try incorporating lemon zest into the cheesecake base for a citrusy twist.
Equipment Needed
- Oven
- Mixing bowls
- Electric mixer
- Mini cheesecake cups or muffin tin
- Measuring cups and spoons
- Spoon or piping bag for layering
How do I make Red, White and Blue Mini Cheesecakes?
Making Red, White and Blue Mini Cheesecakes is a straightforward process that results in beautifully layered desserts.
Step 1: Preheat your oven to 325°F (160°C).
Step 2: In a mixing bowl, combine graham cracker crumbs, sugar, and melted butter. Press this mixture firmly into the bottom of the mini cheesecake cups to form the crust.
Step 3: In another bowl, beat the softened cream cheese until smooth and creamy. Then, add in the sweetened condensed milk and vanilla. Mix until fully incorporated.
Step 4: Split the cream cheese mixture into three separate bowls. Leave one bowl plain, add red food coloring to the second bowl, and blue food coloring to the third bowl until you achieve your desired shades.
Step 5: Spoon the plain cream cheese mixture into the mini cups over the crusts. Follow this with layers of the red and blue mixtures.
Step 6: Bake the assembled cheesecakes for 15 to 20 minutes until just set. Allow them to cool completely.
Step 7: Once cooled, top each mini cheesecake with fresh strawberries and blueberries for a festive finish.
Step 8: Refrigerate for at least 2 hours before serving to enhance flavors and achieve the perfect texture.
| Item | Value |
|---|---|
| Prep time | 30 minutes |
| Cook time | 20 minutes |
| Store time | 3 hours or overnight in refrigerator |
| Calories | Approx. 180 per cheesecake |
| Protein | 3g |
| Carbohydrates | 20g |
| Fat | 10g |
Common Mistakes to Avoid + Pro Tips for Success
Creating Red, White and Blue Mini Cheesecakes is a fun experience, but I’ve learned a few tips and tricks to ensure perfect results every time.
Mistakes to Avoid
| Error | Explanation |
|---|---|
| Overmixing the batter | This can lead to cake-like texture rather than a creamy one. Mix just until everything is combined. |
| Not chilling the cheesecakes | Failing to chill properly can result in a runny texture. Ensure they are refrigerated for at least two hours before serving. |
| Skipping the crust | The crust adds crucial texture and flavor, don’t overlook it for a fully enjoyable cheesecake experience. |
Tips for Success
| Tip | Explanation |
|---|---|
| Use room temperature cream cheese | This helps achieve a smoother batter without lumps for the best texture. |
| Garnish just before serving | Fresh fruit can wilt quickly; adding them right before serving maintains their look. |
| Experiment with flavors | Add extracts like almond or lemon for a twist on traditional cheesecake flavor. |
The most important takeaway for Red, White and Blue Mini Cheesecakes is to ensure you chill them well for the best texture and flavor infusion.
Why You Will Love This Recipe
Red, White and Blue Mini Cheesecakes are a summer favorite of mine.
Perfect for Festive Occasions
These mini cheesecakes are the ideal treat for any barbecue or holiday celebration. Their vibrant colors make them not only appealing but also a great conversation starter at parties.
Easy to Customize
The beauty of this recipe lies in its flexibility. I love that I can easily modify the food coloring for different holidays or events, making these cheesecakes versatile.
Deliciously Creamy Texture
Nothing beats the smooth, creamy texture of these cheesecakes. Each bite is a delightful experience that keeps me coming back for more!
A Fun Activity to Share
Red, White and Blue Mini Cheesecakes are also a great way to get kids involved in the kitchen. They can help with mixing and layering, and I often suggest a tip on how to layer the colors for a beautiful presentation.
Variations, Serving, and Storage
This recipe is perfect for chatting about fun variations and serving options.
Flavor Variations
If you want to mix it up, consider using different flavor extracts. You could substitute vanilla with almond extract or add a bit of lemon zest for a refreshing twist. Another fun idea is to make a chocolate version by mixing cocoa powder into one of the colored fillings.
Best Serving Context
These cheesecakes shine at summer picnics, family gatherings, and holiday parties. I love serving them chilled with a scoop of whipped cream on the side for added indulgence. They pair perfectly with a glass of lemonade or iced tea!
Storage Tips
Store these mini cheesecakes in an airtight container in the refrigerator for up to three days. They can become a bit softer the longer they sit, so I recommend enjoying them fresh for the best experience. If needed, quickly re-chill them before serving.
| Idea | Best for | How to do it |
|---|---|---|
| Adding flavors | Multiple offerings | Incorporate fruit purees or extracts into the cheesecake layers. |
| Presentation | Special occasions | Layer the colors carefully for a beautiful striped appearance. |
| Make-ahead | Busy schedules | Prepare them a day in advance for convenience at events. |
More Recipes You Can Try Next
If you enjoyed Red, White and Blue Mini Cheesecakes, here are some other delightful recipes to try next.
| Recipe Link | Why Try It Next |
|---|---|
| Mini Chocolate Strawberry Cheesecakes | If you love mini desserts, these chocolate-strawberry variations are a perfect next step! |
| No-Bake Mini Biscoff Cheesecakes | Enjoy the ease of no-bake desserts? These mini cheesecakes combine delicious Biscoff flavors! |
| Strawberry Crunch Cheesecake Tacos | These unique cheesecake tacos offer a fun spin on flavors and presentation! |
Final Thoughts
Red, White and Blue Mini Cheesecakes are not only visually stunning but also scrumptiously delectable. They truly embody the flavors of summer and are perfect for sharing at gatherings or enjoying a sweet treat at home.
I’m excited to hear how your cheesecakes turn out, and I hope you enjoy this recipe as much as I do! Feel free to save it for later on Pinterest.
FAQ
Can I use low-fat cream cheese for the mini cheesecakes?
Yes, low-fat cream cheese can be used as a substitute. However, it may slightly alter the creaminess and texture of the cheesecakes. For the best results, look for a high-quality low-fat cream cheese.
Can these mini cheesecakes be frozen?
Freezing is not recommended for these cheesecakes due to the dairy content, which may alter the texture upon thawing. They are best enjoyed fresh or stored in the refrigerator.
How do I know when my mini cheesecakes are done baking?
The cheesecakes are done when the edges are set, but the center should still have a slight jiggle, as they will continue to firm up as they cool.
How can I achieve brighter colors in the cheesecakes?
To achieve vibrant colors, use gel food coloring instead of liquid food coloring, as gel colors provide more pigment without adding extra liquid to the batter.
What is the best way to serve the mini cheesecakes?
These mini cheesecakes taste best served chilled and topped with fresh fruit. You can use a dollop of whipped cream or a drizzle of chocolate for added flavor.
Red, White and Blue Mini Cheesecakes
Delightful mini cheesecakes featuring creamy layers in vibrant colors, perfect for summer celebrations and holidays.
- Total Time: 150 minutes
- Yield: 12 servings 1x
Ingredients
- 1 cup Graham cracker crumbs
- 1/4 cup Sugar
- 1/2 cup Unsalted butter, melted
- 8 oz Cream cheese, softened
- 1/2 cup Sweetened condensed milk
- 1 tsp Vanilla extract
- 1 cup Whipped cream
- Red food coloring, as needed
- Blue food coloring, as needed
- Fresh strawberries, for topping
- Fresh blueberries, for topping
Instructions
- Preheat your oven to 325°F (160°C).
- Combine graham cracker crumbs, sugar, and melted butter in a mixing bowl. Press this mixture firmly into the bottom of mini cheesecake cups to form the crust.
- Beat the softened cream cheese in another bowl until smooth and creamy. Then, add in the sweetened condensed milk and vanilla. Mix until fully incorporated.
- Split the cream cheese mixture into three separate bowls. Leave one bowl plain, add red food coloring to the second bowl, and blue food coloring to the third bowl until you achieve your desired shades.
- Spoon the plain cream cheese mixture into the mini cups over the crusts. Follow this with layers of the red and blue mixtures.
- Bake the assembled cheesecakes for 15 to 20 minutes until just set. Allow them to cool completely.
- Top each mini cheesecake with fresh strawberries and blueberries for a festive finish.
- Refrigerate for at least 2 hours before serving to enhance flavors and achieve the perfect texture.
Notes
Chill the cheesecakes well for the best texture. Use sugar-free sweetened condensed milk for a lighter version if desired.
- Prep Time: 30 minutes
- Cook Time: 20 minutes
- Category: Dessert
- Method: Baking
- Cuisine: American
- Diet: Vegetarian
Nutrition
- Serving Size: 1 cheesecake
- Calories: 180
- Sugar: 12g
- Sodium: 150mg
- Fat: 10g
- Saturated Fat: 5g
- Unsaturated Fat: 5g
- Trans Fat: 0g
- Carbohydrates: 20g
- Fiber: 0g
- Protein: 3g
- Cholesterol: 30mg

No comment yet, add your voice below!